


Previously, I shared some frugal Valentine's Day ideas that we use at our house. One thing that I do each year, is make homemade chocolates to give as a gift to my husband and boys.
Making homemade chocolates is really not that difficult...and they're delicious (especially the ones with peanut butter filling). The picture below shows all the items that you'll need to get started:

- Chocolate Melts (I'm using dark chocolate)
- Chocolate molds - If you want to have a filling in the chocolate (like peanut butter or peppermint), you'll need a deeper mold (like these rectangle or round molds)
- Clean Paintbrush - you'll need this for spreading the chocolate on the filled chocolates
Not Necessary:
- Chocolate Melting Pot - you can either use this, microwave the chocolate or use a double boiler on the stove
- Box for chocolates
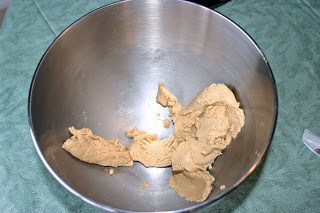
Step One: I make my peanut butter filling.
Ingredients:
- ½ cup peanut butter
- ¼ stick (2 tbsp) melted margarine or butter
- 1 cup powdered sugar
Mix together until it looks like the picture above.
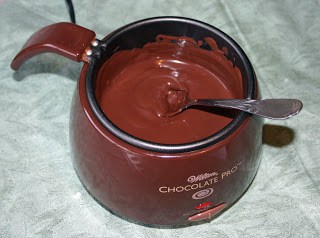
Step Two: Melt the chocolate. You can either purchase a Chocolate Melting Pro, like the one pictured, or you could melt the chocolate in the microwave or in a double boiler on the stove.
It is very important that you do not get the chocolate wet or too hot (in the microwave) or you will ruin it.
It's best to microwave it in short intervals (like 15 seconds at a time) and then stir to avoid overheating.
Step Three: Once the chocolate is melted, you can start spooning it into the molds.
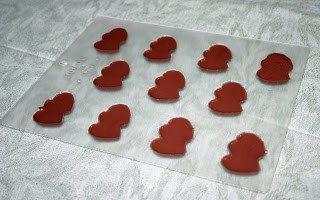
Solid Chocolates - For solid chocolates (like the ones above), spoon some chocolate into the mold and then bang the mold on the table to level it. You will want to level the chocolate (by dropping it on the table) pretty quickly after spooning the chocolate in, so that it doesn't solidify first. Once you have all the molds filled, stick it in the freezer in a level spot for about 10 minutes.
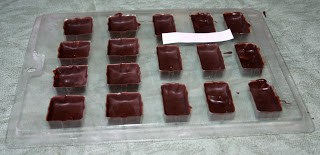
Filled Chocolates: In order to do a filling, you will need to spoon some chocolate into the mold and then use the paintbrush to spread the chocolate around the bottom and sides of the mold (to create a shell). You don't want the chocolate to be too thick (or there's not much room for filling and it will have a thick shell when you bite into it), and you don't want it to be too thin. I usually pick up the mold and check for any thin spots where I can see the light through it. See the picture above for an example of the shell. Once you have all the shells complete, stick the mold into the freezer on a level spot for several minutes.
You can also use the paintbrush to add some other colored chocolate to any detail on the front. I love to add a little pop of color for chocolates that I plan to give as gifts. Just make sure the chocolate is completely dry before you add the next layer.
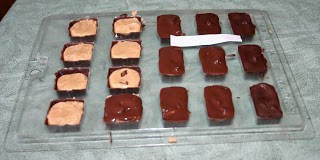
Step Four: Pull the mold out of the freezer and add your filling. I usually take some peanut butter filling and roll it into a ball and pat into the shell. It's easier to add more filling than it is to pull some filling out, so smaller is better. Once you have the filling in, add some more chocolate to the top, making sure that it touches the shell to completely enclose the filling. You can see an example of some chocolates with the peanut butter filling and with the top on it in the picture above.
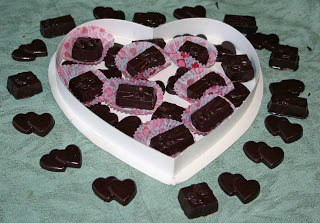
Step Five: arrange your chocolates in a container to give for Valentine's Day. I reuse this box that I bought several years ago for my husband. You can see all the chocolates that I made in the picture above using only 1 bag of the candy melts.
The important thing to remember when you're making chocolates is to have fun! It doesn't matter if the chocolates turn out perfect...they're homemade, right? It's the thought that matters :-).
Have you ever made chocolates before? Any additional tips you'd like to add? Are you inspired to try making chocolates now


Tara aka "Mama Koala"
This is a great tutorial! I've only made the solid kind, and they usually don't look that great. I'm going to try the paintbrush to smooth out the back, and might get brave enough to try to make the filled chocolates as well. Thanks for posting this!
Cheryl
Try tapping your molds on (the entire mold) on top of your cabinet a couple of times; this should smooth things out.
Tamm
First I wanted to say I enjoy your site.
When I make chocolate candy, I put my melted chocolate candy in some little squirt bottles to fill them up quickly.
~Sara
This is a wonderful idea. Thank you for such great directions. I might have to look into getting some candy molds.
Savings Cafe
I'm definitely inspired to make those peanut butter chocolates!!
newlyweds
These sound so yummy, what a great idea!
Kara
These look so yummy, especially the peanut butter filled ones. Using the paint brush to spread the chocolate is such a great idea!!
Melanie
Hi, I'm all excited to try the peanut butter filled chocolates. I have one question. Do you mean 1/4 cup melted butter or 1/4 stick (2 Tablespoons) of melted butter? Thanks so much!
Corrie at "Cents"able Momma
Hi Melanie,
It's a 1/4 stick (2 tbsp) of melted butter. I've adjusted the directions above to make it a little more clear.
Thanks!
Melanie
Thanks, Corrie! I'm going for it! 🙂
Melinda
Okay, so I had a lot of fun playing with chocolate on the 13th. Enough that I went and bought some actual molds, instead of using the flexible ice cube trays I used for Valentine's. I'm going to try the filling, but I was wondering if you had any other filling recipes or would know where to find them? Thanks.
Melinda
Corrie at "Cents"able Momma
Melinda,
I'm glad you enjoyed making chocolates! My mom has a great peppermint filling recipe that I'll try to find and post tomorrow.
Kelly Quimby
I tried to follow the link for essortment. It's a name for sale. Any corrections to the address?
Corrie C
I didn't see one. I tried to Google for a site with a variety of filling recipes, but I couldn't find one. I would suggest just googling for the filling recipe you want (like peppermint filling recipe for chocolate or caramel, strawberry, etc.). Sorry I couldn't help more!
jodi
When making chocolates,you can get fancy and use different colors for the designs- in your case, the ribbon on the filled candies. I found that dipping a toothpick in the colored chocolate works great at getting into tiny designs.
And there are colored foils that you can wrap your chocolates in too if you dont have a nice box. Or make lollipops,which those supplies can usually be found near the chocolate wafers. There is also shimmer powder you can paint on that looks awesome.
I made chocolates for my wedding. It was at thebeach and i made starfish and sharks and used colored chocolates for each and used a paintbrush to brush on gold and silver shimmer to make it look more realistic. I also did chocolates for a party favor for my daughters baptism. Little crosses that i did in white, milk and purple chocolate and there was a flower embellisment that i did in a contrasting color with green leaves. Easy to do and everyone loved them.
Jeremy Brooks
In the peanut butter filling recipe, I like to use extra peanut butter and a little less butter. I don't like all that fat in my recipes. I love to cut down on all that fat. I don't trust some of the quantity of the ingredients in some of the candy recipes, as I just do my best to save money and calories. 1/2 stick butter is a little too much for me to handle, so I cut it down to like a sliver of softened butter and I also might add about a cup and a half of peanut butter, as it is good protein along with a cup of powdered sugar and 1/2 tsp vanilla. I love smooth peanut butter filling inside of chocolates because it represents me the number 95 because it tastes so good. Too much butter is not good for you.
jennifer
My biggest concern is getting the chocolate out of the mold once it sets. I sometimes run warm water on the bottom...sometimes they just pop right out (depends on the mold.) but the hard plastic molds seem to be the kind to always give me trouble. I prefer the silicone molds for quick release. Any suggestions for candy removal from the hard plastic molds?
Corrie C
If you're having trouble getting the chocolate out of hard plastic molds, try putting them back in the freezer for a bit longer. Usually, once the chocolates are ready to come out of the mold it will look like the chocolate has separated from the mold a bit when you look at it from the bottom.